terça-feira, 4 de março de 2014

Semiconductors Factories in Brazil

Edited on December 11th 2015

This post presents the semiconductors factories currently in operation or in construction in Brazil: CEITEC S.A. and SIX Semicondutores S.A. Unitec Semicondutores (name change in the beginning of 2014 due to the shareholding restructure of the company).

CEITEC S.A. is located in Porto Alegre, capital of Rio Grande do Sul state. This factory is currently in operation and manufactures in a 0.6 um CMOS technology (licensed from X-FAB). The factory is a public company of the Brazilian federal government.

SIX Semicondutores S.A. Unitec Semicondutores is located in Ribeirão das Neves, Minas Gerais. This more advanced factory is currently in construction and has the capability of manufacturing in 90 & 130 nm CMOS technologies (licensed from IBM). This factory is the result of a partnership among private and public entities.

Below it is shown the actual plant of CEITEC S.A. and the project and actual plants of SIX Semicondutores S.A. Unitec Semicondutores.

CEITEC S.A. factory
Source: link to photo

SIX Semicondutores S.A. Unitec Semicondutores factory plant
Source: link to photo

Unitec Semicondutores factory


Microelectronics Design Centers in Brazil

This brief post shows the Brazilian microelectronics design centers in the scope of the IC Brazil program, which aims to support the creation, installation and attraction of integrated circuits design companies to Brazil.

Currently there are twenty-three design centers in operation, which work on digital, analog, mixed-signal, and/or RF integrated circuits. The map below shows how the design centers are spread across the country and tries to categorize them by specialty.

By clicking on the map markers it is possible to get further information about the respective design centers, including their websites.

If the reader believes some design center was forgot and/or wrongly categorized, please leave a comment below. Doing so I'll be able to update and keep the map as accurate as possible.


View Microelectronics Design Centers in Brazil in a full screen map

quinta-feira, 20 de fevereiro de 2014

Incontro con le radici

Edinei Santin, quadrisnipote di Nicolò & Giacoma Santin
Pubblicato nel Bollettino delle Comunità di Coltura, Mezzomonte, Polcenigo e S. Giovanni di Polcenigo - Dicembre 2013

Per capire meglio questo articolo bisogna tornare indietro 129 anni, a 1884. Nel dicembre di quell'anno, la famiglia di Nicolò Santin e Giacoma Santin (marito e moglie con lo stesso cognome e, ancora di più, lo stesso soprannome: Canal), riceveva del Comune di Polcenigo il passaporto per partire per Sud America, precisamente per Brasile. Con i loro cinque figli: Vincenzo Giuseppe, Ferdinando, Angelo, Maria ed Antonio Isidoro, questa famiglia di origine mezzomontina imbarca nel Porto di Genova su il vapore Coventina. In Mezzomonte restavano un bambino di nome Arcangelo, ma questo in cimitero, morto precocemente dopo 9 mesi di vita, e probabilmente molti amici e conosciuti.

Nel 17 gennaio 1885 loro arrivano nel Porto di Rio de Janeiro, Brasile, e nel 25 dello stesso mese a Porto Alegre, nello stato brasiliano del Rio Grande do Sul (vicino Argentina ed Uruguay). Ma è stato necessario più 18 giorni, quindi quasi due mesi dalla partenza a Genova, per arrivare al destino finale: un piccolo pezzo di terra per colonizzare nella città che oggi si chiama Monte Belo do Sul, anche questa nel Rio Grande do Sul, circa 140 km di Porto Alegre. Questo ultimo percorso è stato fatto in barca, ma anche un bel pezzo a piedi. Sicuramente loro avevano una buona salute, altrimenti non avrebbero completato questo lungo ed estenuante viaggio.

Dopo alcuni anni, con i matrimoni dei figli, il piccolo pezzo di terra è insufficiente per tutti, e la famiglia, a eccezione della figlia Maria, si sposta circa 60 km al nord-ovest. Alcuni anni più tardi, intorno 1913, questo fenomeno si ripete, e la famiglia si stabilisce in maggioranza nella città di Marau, nel nord del Rio Grande do Sul, e rimane li fino ad oggi. Quindi, la maggioranza dei discendenti di Nicolò e Giacoma Santin in questi giorni vivono nel nord del Rio Grande do Sul, ma si sa che ci sono altri discendenti che vivono in altre regione del Brasile, come Santa Catarina, Paraná e Brasília, e altri che vivono in altri paesi sud-americani, per esempio, in Chile. Questi ultimi sono frutti della avventura del figlio Ferdinando, che a emigrato con la sposa e il figli per il Chile nel inizio del Novecento, ma tornato in Brasile circa 10 anni più tardi, no senza lasciare figli sposati in quello paese.

Questo brevissimo racconto dimostra i passi dei miei antenati da Polcenigo a Marau. Adesso, prima di scrivere sul mio incontro con le radici, credo essere informativo scrivere alcune parole su l'autore di questo articolo e sue motivazioni per conoscere la città natale dei suoi antenati. Sono nato a Marau, nel 1986, e mi sono laureato in Ingegneria Elettrica nel 2008, nella Universidade Federal de Santa Maria, Brasile. Dal 2009 sono a Lisbona, Portogallo, a causa del mio Dottorato di Ricerca in Microelettronica (circuiti integrati), nella Universidade Nova de Lisboa, che ormai è quasi concluso.

Alla fine del 2012, dopo un paio di informazioni che ho raccolto degli miei familiari, ho deciso di creare un sito web per raccogliere e condividere le informazioni dei discendenti di Nicolò e Giacoma Santin. L'idea era quella di costruire un “puzzle” della storia della famiglia con la collaborazione spontanea dei discendenti che navigano attraverso il web. Se ogni di questi potrebbe collaborare con un piccolo pezzo, allora avremmo un grande puzzle alla fine. Con il rilascio del sito, molte persone, discendenti o non, mi hanno contattato e il mio interesse sull'argomento è aumentato giorno dopo giorno, contatto dopo contatto. Uno di questi contatti fu da Giovanni Mezzarobba detto Gambin, da Mezzomonte. Giovanni gentilmente ha condiviso informazione su Mezzomonte, e stuzzicato la mia curiosità su il piccolo paese, che all'epoca era già significativa.

Con questo stimolo da Giovanni, ho deciso di visitare Polcenigo nel scorso ottobre per otto giorni. Il mio obiettivo era quello di conoscere il luogo e le persone, di trovare alcuni antichi documenti di famiglia e fare qualche fotografie, e di mangiare alcune castagne nella Sagra della Castagna.

Arrivando a Polcenigo, ho soggiornato a Palazzo Scolari e dunque il mio primo contatto personale con polcenighesi è stato con Anna Salice. Anna mi ha ricevuto con grande ospitalità e cordialità, che mi ha fatto sentire come arrivato a casa mia. Questo modo affettuoso di ricevere le persone è, per fare una comparazione, molto simile a quello degli immigrati italiani in sud del Brasile. L'intero soggiorno a Palazzo Scolari è stato meraviglioso.

Nei vari giri di bicicletta per Polcenigo, ho visitato, goduto i belli paesaggi ed assaporato la buona gastronomia di tutte le frazioni, a eccezione di Mezzomonte, perché per questa ultima ho imparato per esperienza, ormai al mezzo della montagna, che è più conveniente utilizzare la macchina. Così, con la buona volontà di Giovanni Mezzarobba, ho visitato Mezzomonte (il luogo esatto di nascita dei miei antenati) nei dettagli durante tre giorni. Ho andato alla chiesa, al cimitero, in questo ultimo per vedere se alcuni dei miei antenati c'erano ancora lì, ma purtroppo non erano, e ho osservato soprattutto le vecchie case e il terreno, cercando di immaginare come i miei antenati vivevano lì, che difficoltà loro affrontavano, ecc. Ho anche partecipato alla Sagra della Castagna, che oltre ad una buona festa per mangiare e divertire, è stata un buon posto per parlare e interagire con le persone. Questa interazione, nonostante il mio cattivo italiano, fu molto amichevole ed informativa.

Sempre con Giovanni, ho anche visitato al Museo dell'Emigrazione a Cavasso Nuovo. In questo museo, nella sezione dei pionieri nelle campagne del Brasile e dell'Argentina, ho trovato un rapporto, con fotografie, sulla famiglia di Nicolò e Giacoma. Quindi, più una bella sorpresa di questo mio viaggio.

Come ho detto prima, uno dei obiettivi della visita era anche trovare alcuni documenti antichi: certificati di nascita e di morte, atti di matrimonio, ecc., per conoscere ancora di più sulla storia della famiglia, e anche per condividere questa conoscenza sul sito web. A tal fine, ho visitato la Chiesa San Giacomo Apostolo per due pomeriggi e contato con la gentile ed utile collaborazione di Mario Cosmo. Vedere quelli libri con cento, duecento oppure più anni e ben conservati fu qualcosa di affascinante, meglio ancora che questi libri antichi avevano infatti informazioni sul miei antenati. Al fine del mio soggiorno, ho anche avuto l'opportunità di incontrare, anche se molto brevemente, lo scrittore Alessandro Fadelli, che me ha regalato un libro sul il fenomeni migratori polcenighesi.

Per finire questo piccolo articolo, vorrei dire che il mio incontro con le radici è stato memorabile. Anche, vorrei ringraziare ancora una volta le persone che mi hanno ricevuto tantissimo bene a Polcenigo. Sicuramente tornerò in futuro, se ho la possibilità, e, per quei interessati a visitare el Rio Grande do Sul, sarebbe un piacere restituire (o almeno cercare di restituire) la ospitalità ricevuta da voi. L'indirizzo del sito web citato in questo articolo è: https://sites.google.com/site/nicolosantingiacomamezzarobba/.

Cordiali saluti!

Nota Redazionale: Si è preferito lasciare l'originale senza correzioni perché il testo è chiaramente comprensibile... pensando a quanti errori ortografici e sintattici commetteremmo noi se scrivessimo in portoghese!

segunda-feira, 2 de dezembro de 2013

Un piccolo paese chiamato Mezzomonte


Por Edinei Santin, tetraneto do casal de imigrantes italianos Nicolò & Giacoma Santin

A busca pelas raízes familiares pode despertar encantamento em algumas pessoas e curiosidade em outras tantas. No meu caso, certamente, trata-se de encantamento. Motivado por este sentimento, no início do mês de Outubro do corrente ano visitei durante oito dias o local onde os meus tetravós Nicolò & Giacoma Santin habitavam antes de emigrarem para o Rio Grande do Sul em 1884.

Mezzomonte, além de berço dos meus tetravós, é berço de muitas outras famílias Santin que vieram a se estabelecer no Brasil, mas também em outros países sul-americanos. É importante, entretanto, fazer uma ressalva: nem todos os Santin são originários de Mezzomonte, visto que este sobrenome é comum em outras regiões da Itália.

Sendo uma das cinco frazioni (distritos) do município de Polcenigo, Mezzomonte, como o nome bem indica, localiza-se nas encostas de uma montanha, algo que, por si só, é bastante peculiar na região. A imagem abaixo mostra as características geográficas do local. A altitude com relação ao nível do mar é de 477 metros, e em relação ao vale, onde se situa o distrito de Gorgazzo (também pertencente a Polcenigo), e de aproximadamente 400 metros. Assim, para se chegar até Mezzomonte, deve-se percorrer uma estrada sinuosa e íngreme. Esta, porém, é toda asfaltada e bem sinalizada.

Vista panorâmica de Mezzomonte (clique sobre a imagem para aumentar)

O município de Polcenigo fica a aproximadamente 80 km ao norte de Veneza e a 60 km ao oeste de Udine. Atualmente, em todo o município, habitam pouco mais de 3.000 pessoas. Em Mezzomonte, especificamente, habitam cerca de 30 pessoas, um número relativamente baixo se comparado com o número de habitantes das décadas passadas (na década de 1950, por exemplo, habitavam cerca de 850 pessoas). Devido a esta queda acentuada na densidade demográfica, alguns pesquisadores falam no risco de extinção do distrito; porém, pelo carinho com que as pessoas se referem a Mezzomonte, não acredito que isso de fato irá acontecer.

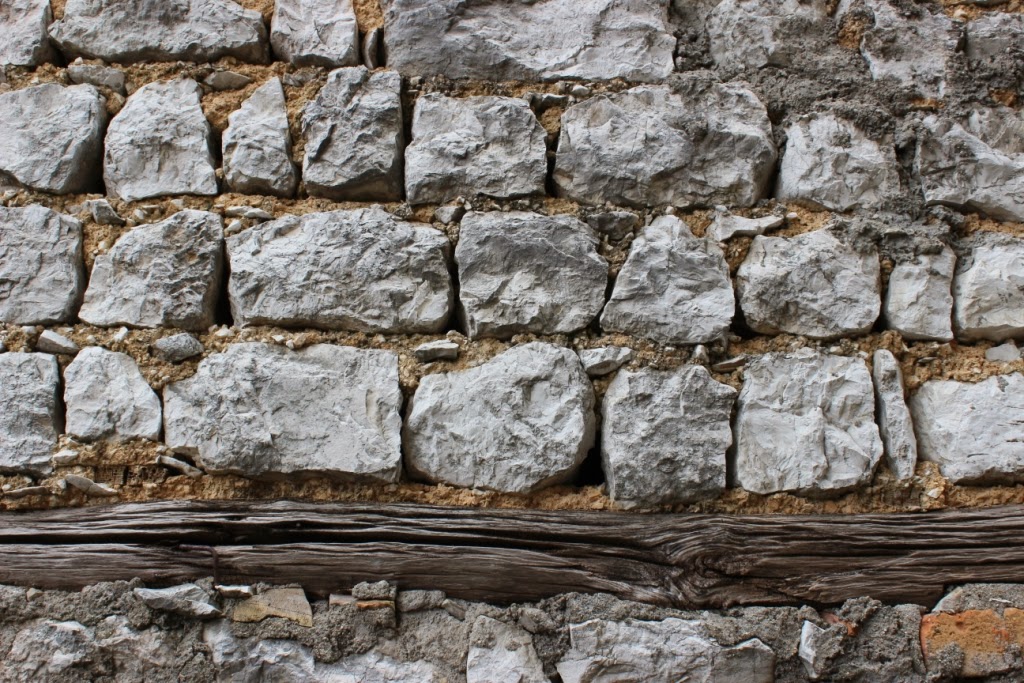
Várias ruelas, denominadas de vicolo ou via, facilitam o acesso às casas e aos locais públicos, como o cemitério e a igreja. Uma destas ruelas, o Vicolo Forada, é mostrado na imagem abaixo. Nesta fotografia é interessante notar também como as casas são construídas. No geral, elas são feitas com pedras justapostas com argamassa de cimento, porém, no passado, utilizava-se uma espécie local de barro e também madeira para assentar as pedras, como ainda é possível ver nas casas mais antigas.

Vicolo Forada em Mezzomonte

Detalhes do assentamento de pedras com barro e madeira (casas antigas)

A igreja de Mezzomonte leva o nome de Sant’Antonio Abate (Santo Antão), santo protetor dos animais, e é mencionada pela primeira vez nos documentos em 1458. O campanário ao lado da igreja é mais recente, foi construído em 1958. Por sua localização e altura, esta torre é visível de praticamente todos os distritos de Polcenigo.

No interior da igreja encontram-se várias imagens, vitrais e afrescos nas paredes e no teto. O belo altar de mármore é do séc. XVI. No teto da igreja, é notória uma pintura que retrata um dos acontecimentos mais tristes da história de Mezzomonte: no dia 4 de Fevereiro de 1945, durante a 2ª Guerra Mundial, oito pessoas foram mortas, a tiro, pelos nazistas. Para completar o triste episódio, no mesmo dia, as casas dos humildes camponeses foram depredadas e incendiadas.

Igreja de Sant’Antonio Abate em Mezzomonte

Interior da Igreja de Sant’Antonio Abate

Pintura no teto da Igreja de Sant’Antonio Abate para retratar o triste episódio da 2ª Guerra Mundial

No cemitério de Mezzomonte, para além do sobrenome Santin, aparecem outros sobrenomes igualmente conhecidos no Rio Grande do Sul: Zanchet, Piazzon, De Bortoli, etc. Infelizmente, os túmulos mais antigos, de antes de 1850, não estão mais no local. Estes túmulos foram, com o passar dos anos, substituídos por outros mais recentes (provavelmente numa tentativa de limitar a área do cemitério).

São somente sete os sobrenomes originais de Mezzomonte: Alfier, De Bortoli, Della Rossa, Mezzarobba, Piazzon, Santin e Zanchet. Como mencionei anteriormente, nem todas as pessoas que carregam estes sobrenomes nos dias atuais são originárias de Mezzomonte. Para além do sobrenome, figuravam (e ainda figuram atualmente) os soprannomi (apelidos). Estes serviam para diferenciar os diferentes ramos familiares com o mesmo sobrenome. Assim, por exemplo, o meu tetravô chamava-se Nicolò Santin detto Canal, ou seja, tinha apelido Canal (era do tronco familiar dito Canal). Outros apelidos de Santin em Mezzomonte são Buset, Cesch, Longon, Tonon, e por aí afora.

Cemitério de Mezzomonte

O pacato distrito de Mezzomonte torna-se, anualmente, nos fins de semana do mês de Outubro, mais agitado. É época das castanhas e da tradicional Sagra della Castagna (Festival da Castanha). Neste festival ocorrem atividades culturais, recreativas, música ao ar livre, e pode-se saborear alguns pratos, doces e bebidas feitos com castanha (sim, existe uma cerveja feita com um certo percentual de castanha!), além, é claro, da própria castanha in natura assada ou crua.

Além dos produtos baseados na castanha, existem outras especialidades locais a disposição. Por exemplo, num almoço dentro da tenda do festival pude saborear um prato de gnocchi, recheado com carne bovina e queijo, acompanhado de duas belas fatias de polenta e três saborosas fatias de queijo recheado com castanha. Tudo muito delicioso e de deixar água na boca.

Programa da 28ª Sagra della Castagna (clique na imagem para aumentar)


Assadeira de castanhas (manuseada pelos assadores locais)

Gnocchi, polenta e queijo recheado com castanhas: uma das opções de almoço no festival

Por fim, não poderia não mencionar a hospitalidade e a receptividade que tive das pessoas de Mezzomonte e região. Fui de tal forma bem acolhido que me senti em casa desde os primeiros minutos. Com todas as pessoas que tive a oportunidade de conversar (e não foram poucas), todas, sem exceção, se mostraram interessadas e dispostas a interagir, apesar do meu italiano básico e rude.

Espero ter despertado a curiosidade de algum descendente Mezzomontino com este post sobre as nossas origens. Eu me disponho, dentro do possível, a esclarecer eventuais dúvidas sobre Mezzomonte. Para tal, basta fazer um comentário neste post, ou contatar-me diretamente através de email. Para o segundo caso, o meu endereço eletrônico encontra-se neste site: https://sites.google.com/site/nicolosantingiacomamezzarobba/ , que também disponibiliza mais informações sobre o ramo familiar dos meus tetravós Nicolò & Giacoma Santin.

terça-feira, 13 de agosto de 2013

Hand Soldering for Electronics

This post shares three informative videos about hand soldering applied to Electronics. The first video introduces the basic tools and materials needed to do good solder joints. The second video addresses soldering techniques and tips applied to through-hole components soldering. Finally, the last video discusses techniques useful for surface-mount components. Following each video appears a brief summary of the respective video content. Have fun soldering your boards! After all it's a "piece of cake"! :-)


Soldering Tutorial Part 1 - Tools & Materials


Summary of the tools and materials mentioned in the video for quick reference.
Main tools:
- Adjustable temperature soldering iron (e.g. Hakko FX-888 | Typical temperature range from 350 to 400 ºC, being 350 ºC a good typical soldering temperature | Lower temperatures for heat-sensitive components)
- Flush side cutter (e.g. 170M Xcelite)
- Solder wire (e.g. Multicore | Top quality brand | Diameter < 0.5 mm | Alloy 60/40 or 63/37 (recommended) or 62/36/2 (Sn/Pb/Ag) | Not recommend lead-free solder, more difficult to use | Multicore flux solder highly recommended)
- Desoldering wick, aka Desoldering braid (e.g. Multicore | Top quality brand)
- Tweezers (e.g. C.K 2343 | Stainless steel | Non-magnetic)
- Different types of tips for soldering iron (Not recommended conical tip | Chisel tip recommended | 2 or 2.5 mm typical diameter tip)
- Magnification loupes (2.5x to 8x magnification range recommended)
- Flux pen (e.g. Electrolube SMF12)
Secondary tools:
- Hot air rework soldering station (e.g. Atten AT858D)
- Safety goggles
- Fume extractor
- Vacuum desoldering pump solder sucker
- PCB holder
- Solder paste


Soldering Tutorial Part 2 - Through Hole Technology Soldering


Summary:
- Soldering through-hole technology components
- Soldering iron at 350 ºC (typical soldering temperature)
- Touch the chisel tip simultaneously on the pin and on the pad
- Do not apply solder to the iron tip because the flux will go out and it will result in a cold solder joint
- Flux is important to clean oxidation over pins and pads, allowing the solder melt appropriately and forming a reliable solder joint
- For through-hole components soldering, it is sufficient the flux built-in in the solder itself (do not need to apply external flux)
- Soldering step-by-step: i) clean tip; ii) apply the tip on pad & pin; iii) leave the tip in touch with the pad & pin by about 1 sec. or more; iv) apply a small amount of solder to the opposite side of the joint; and v) remove tip
- High quality solder joint will be very bright, shiny, and smooth (at least for solder containing lead)
- Flux residue left over can be cleaned with a special fluid
- Use specific lead-free iron tips for lead-free solder
- Periodically apply solder on the tip to protect its plating againt aging
- Use a electronic cleaning solvent (e.g. Electrolube IPA) for flux removal
- Spray the solvent on the flux residue & rub with an anti-static brush
- If you apply to much solder, you can use the desoldering wick to suck some solder
- Super-fine (canonical) tips are difficult to use (avoid them)
- It is possible to put a bit of solder on the tip to help heat the joint quicker, but after heating do not forget to apply a bit of additional solder with flux to build a good solder joint
- Thermal reliefs in pads attached to large copper planes help the soldering process (easier to heat the pads)
- If you do not have flux, then soldering does not work at all (hence it is important use multicore flux solder wire)
- In military or aerospace applications, they use better techniques and materials for soldering
- Fine diameter solder wire helps to control the amount of solder applied
- Two ways to solder connectors (see video for details)
- Use a bigger chisel tip (to increase thermal transfer) to solder larger joints (e.g. big components or ground planes) and also a 1 mm or more diameter solder wire
- Basic rules for hand soldering:
+ Good brand temp controlled iron
+ Good brand < 0.5 mm diameter solder
+ Flux is everything (because metals oxidize too easily). In solder itself or separate
+ Use the right tip. Chisel tip is best
+ Don't bring the solder to the joint! Iron one side, solder in the other
+ Use the right temp. 350 ºC tops


Soldering Tutorial Part 3 - Surface Mount Technology Soldering


Summary:
- Surface-mount device (SMD) typical package sizes: 1206, 0805, 0603, 0402, ... For hand soldering, use 0603 or larger packages. Packages 0402 or smaller require some kind of magnification for soldering
- Current not-advanced pick and place machines are able to deal with package sizes 0603 or bigger only
- Standardized footprints for SMDs come at least, normal and most pad sizes. It's recommended to use the normal or most pad size (easier to solder)
- Soldering step-by-step: i) apply a small amount of solder on one pad; ii) put the SMD in place with a tweezers and reflow the solder of the previous step with the iron tip; iii) solder the other side of the component; iv) check the solder joint with a loupe
- Soldering a 8-pin integrated circuit (IC): i) apply a small amount of solder on a corner pad; ii) place the chip with a tweezers and reflow the solder of the previous step to tack the chip in place; iii) solder the diagonally opposed pin; iv) solder the remaining pins; v) inspect the soldering with a magnification loupe
- Solder mask is vital for SMD soldering because it prevents shorts between adjacent closely-spaced pins
- Soldering a fine-pitch 0.5 mm IC: i) apply a small amount of solder on a corner pad; ii) place the chip in the right position with a tweezers and reflow the solder of the previous step to tack the chip in place; iii) solder the diagonally opposed pin; iii) apply flux to help the soldering process; iv) put some solder in the concave tip (special iron tip); v) drag the concave tip with solder over the pins and pads for soldering the remaining pins all together; vi) use the desoldering wick to remove some short, if needed; vii) verify pin shorts with a loupe
- Another soldering method, which doesn't require a special concave tip, uses a normal chisel tip to drag the solder over the IC pins. Don't forget to apply flux over the pads before dragging the solder
- Even another technique uses solder paste with a hot air gun (typical temperature for hot air is 350 ºC)
- For fine-pitch SMDs it is recommended gold finishing over the pads (flatter & doesn't corrode)
- Small SMDs can be damaged by excessive temperatures. Also excessive heat may lift the pads. Be careful!

UPDATE:
The next video shows a technique to solder SMD packages with a bottom thermal pad using soldering iron.


segunda-feira, 10 de junho de 2013

The Golden Rules of Sleep

Most normal persons spend around 1/3 of their lives sleeping. Hence, it is important to make this part of our lives as functional as possible. This post presents some material to improve the sleeping experience of open-minded persons (those that consider any opportunity to enhance their lives).

The material presented was mainly collected from the references listed at the end of the post, which the reader is encouraged to read. These references are well-known books in the field of sleep. Although the books differ from the content presented, their messages overlap considerably and the rules suggested to improve the sleep are more or less equivalent.

According to reference [1], the golden rules of sleep are as follows:
1. Get up regularly half an hour earlier than your usual desired getting up time.
2. Go to bed only when you are sleepy.
3. Don't take any naps during the day.
4. At least three times a week, take at least twenty minutes exercise.
5. Finish eating at least three hours before you go to bed.
6. Don't have any caffeine after 2 pm.
7. Cut out alcohol.
8. Switch off the TV one hour before you go to bed.
9. Do only three things in bed: sleep, make love and use the book or CD (the CD comes together with the book of reference [1]).
10. If your are awake in bed for more than twenty minutes, do one of the exercises (included in the book of reference [1]) or get up and do something boring.
11. Keep your bedroom dark at night.
12. Have a warm, comfortable bed in a room that is not too hot.
13. Don't watch the clock.
14. Use the CD (that comes with the book of reference [1]).

From all the above fourteen rules, the top three are the most crucial. The 'half an hour' mentioned in Rule #1 is simply to ease your falling asleep process. The idea is that, if you get up half an hour earlier, you will probably fall asleep a bit earlier too (and this is useful for persons with difficulties to fall asleep). So, for instance, if you believe 8 am is a good time to get up, set your alarm clock at 7:30 am (half an hour earlier) and get out of the bed exactly when the alarm clock rings (should be difficult during the first days, but within a week or two this becomes a habit). From Rule #1 it is important to highlight 'regularly'; this is to mean you must get up at the same time all days including weekend days.

If you follow Rule #1 honestly and go to bed only when you are sleepy, i.e., follow Rule #2 as well, within a week or two your sleep pattern will be regularized. If you have, or had in the past, some sleep trouble, the chances are that what caused the trouble was a poor sleep pattern. Therefore, following Rules #1 & #2 properly will recover your natural and healthy sleep pattern. In following these rules note that you have full control over your get up time but not over your somnolence state. Hence, forcing a regular and fixed get up time and monitoring your somnolence state (if you are sleepy or not) to judge the right time to go to bed seems a reasonable advice to recover a sleep pattern within a couple of days (obviously take some time to recover your pattern, but if you follow the rules honestly after a week or two it will be much better; within a month it will be very robust). It is also worthy to note that your sleep pattern may be 6, 6:30, 7, 7:30, 8 or even another value hours long. The sleep duration will be the one that best fits your needs.

The outcome of Rule #3 is pretty obvious: if you take naps during the day your chances of falling asleep around a well-defined time (which is a requirement of a robust sleep pattern) decrease considerably. Hence, avoiding naps leads to a faster sleep pattern recovery and also prevents your pattern from deterioration once you have fully recovered it.

Rules #4 to #14 may be classified as complementary rules, since they can be practiced to improve the sleep experience of a person incrementally. The book and the accompanying CD of reference [1] contain a list of relaxing exercises (mentioned in Rule #10) and recorded hypnotic sounds (mentioned in Rules #9 & #14) targeted at sleep. Although it is not needed to buy the book and the accompanying CD to improve your sleep substantially (it is enough to follow the rules shown above), it is recommended for those persons that want to known a bit more on the subject.

To make clear that the rules presented in the references are more or less equivalent, below are outlined the rules suggested in reference [2], so the reader can compare them with those of reference [1] presented above:
1. Spend less time in bed.
2. No naps.
3. Get up and do something when you can't sleep.
4. Get up at the same time every day, including weekend days.
5. Do nothing in bed but sleep or make love.
6. Reduce or eliminate the pills.
7. Stop clock-watching.
8. Replace negative sleep talk with positive statements.
9. Let go of the search for an instant miracle cure.
10. Discover a relaxation technique that works for you.
11. Decide on your own safety thought.
12. Put your life before your insomnia.

And, according to the author, "for most (persons), sticking to the first six (rules) will be all that is needed to begin sleeping well again".

References:
[1] Paul McKenna, I Can Make You Sleep (neat and fast-reading book plus a bonus CD)
[2] Sasha Stephens, The Effortless Sleep Method: The Incredible New Cure for Insomnia and Chronic Sleep Problems (book written from a recovered chronic insomnia sufferer perspective)
[3] Gregg D. Jacobs, Say Goodnight to Insomnia: A Drug-Free Programme Developed at Harvard Medical School (for those readers interested in a more rigorous scientific work)

sexta-feira, 7 de junho de 2013

Lens basics

Some basic terms related to lenses are presented hereinafter. For more details, one is encouraged to consult the references listed at the bottom.

Prime vs. Zoom Lenses
Prime lenses have fixed focal length and don't zoom. Zoom lenses have the ability to zoom in or out and, when specified, both the minimum and the maximum focal lengths are indicated, e.g. 18-55 mm. This means that the focal length in zoom lenses can be adjusted continuously in the range from 18 mm to 55 mm, considering the previous example. Prime lenses tend to be smaller and lighter, have wider maximum apertures, and give sharper images than zoom lenses, but zoom lenses have become widespread to due their ability of producing different angles of view.

Wide-angle vs. Normal vs. Telephoto Lenses
Wide-angle lenses produce the widest angle of view, while telephoto lenses produce the narrowest. In between these two extremes stand up the normal lenses. In rough words, wide-angle lenses have focal lengths of 18 mm or shorter, while telephoto lenses are characterized by focal lengths of 55 mm or longer (assuming a sensor size of approx. 24 mm x 16 mm, available in most affordable SLR cameras).

Focal Length
Definition: It is the distance between the lens and the camera's sensor (or film) when the subject is in focus. It is usually stated in millimeters (e.g. a focal length of 55 mm).
Control: The focal length of a zoom lens can be adjusted rotating the lens' zoom ring. For a prime lens the focal length is fixed, i.e. the focal length can be changed only changing the camera lens.
Effects: A shorter focal length produces a wider angle of view and a large area of the scene is captured (apparent size of the subject is smaller). Conversely, a longer focal length leads to narrower angle of view and a small area of the scene is captured (hence the subject appears to be larger).
Tip: Due to the popularity of the 35 mm film standard (with size of 36 mm x 24 mm and diagonal of 43.3 mm) and today's availability of camera sensors with different sizes, camera-lens combinations may be described in terms of their 35 mm equivalent focal length for straightforward comparison. For example, a 55 mm focal length lens on a camera with sensor size of 22.3 mm x 14.9 mm (diagonal of 26.8 mm) has a 35 mm equivalent focal length of (55 mm) x (43.3 mm / 26.8 mm) = (55 mm) x 1.6 = 88 mm. Hence, a 88 mm focal length lens on a full-frame 35 mm camera will produce the same angle of view of a 55 mm focal length lens on a 22.3 mm x 14.9 mm sensor size camera.

Maximum Aperture
Definition: It is the maximum diameter of the lens opening that can be selected with the lens. The maximum aperture is achieved with the minimum f-stop number of the lens.
Control: The maximum aperture is a lens specification and the photographer cannot change it unless another lens is used. This specification is generally included in the lens model name (e.g. the zoom lens Canon EF-S 18-55mm f/3.5-5.6 IS II has maximum apertures of f/3.5 when at focus length of 18 mm and of f/5.6 when at focus length of 55 mm).
Effects: Lenses with wider maximum apertures (lower minimum f-stop numbers) create a brighter image on the camera's sensor than lenses with small maximum apertures (higher minimum f-stop numbers). Also, wider maximum apertures allow smaller depths of field than narrower maximum apertures do.

Minimum Focus Distance
Definition: It is the shortest distance from the focal plane mark on the camera body to the subject at which a lens can still focus.
Control: The minimum focus distance is a lens specification (usually included in the model name) and the photographer cannot change it unless another lens is used (or an accessory is connect to the lens).
Effects: If the camera is too close to the subject that the minimum focus distance is violated, then to put the subject in focus will be very difficult or even impossible.

Angle of View
Definition: It is the visible extend of the scene captured by the image sensor.
Control: The angle of view is indirectly controlled by the lens' focal length.
Effects: A wider angle of view captures a greater area, while a narrower angle of view captures a smaller area of the scene.

References:
[1] Nikon Website, Digital SLR Camera Basics - Lens
[2] Andy Westlake (dpreview), Digital camera lens buying guide